Search engine optimisation (SEO) is an essential digital marketing tool for online businesses. This article explores how a powerful onsite SEO strategy improves webpage rankings on search engines.
If you are new to SEO, we recommend finding out more about it on our SEO services page. We offer an introduction to the topic, which is helpful for this blog.
What Is Onsite SEO?
Onsite and offsite SEO methods makes up two halves of the whole that is SEO. Anything involving physical changes to a website is classed as onsite SEO (sometimes called on-page SEO). Conversely, offsite (off-page) SEO involves optimisation from incoming external links provided by other websites.
Why Is an Onsite SEO Strategy Important?
Search engines such as Google guard information about their search algorithms. This prevents false manipulation of rank positions, protecting the quality of the service provided by the search engine. Despite this, onsite SEO (particularly the points we are about to explore below) is commonly known to be essential for search engine results page (SERPs) rankings. All work to provide a good user experience for the search engine user.
Steps for An Effective Onsite SEO Strategy
The first step to a meaningful onsite SEO strategy is identifying your website’s weaknesses. The steps to an effective strategy (shown below) are in priority order. To achieve the rank results you want quickly, conduct your onsite SEO strategy by addressing your website’s gaps in the same order.
- Check for Crawling & Indexing Issues
- Add Keywords in Key Places
- Create Meaningful Content
- Add Schema.org Mark-up
- Optimise for User Experience
- Identify Keyword Gaps
- Create a Blog Strategy
Step 1 – Check for Major Technical SEO Issues Impacting Crawling & Indexing
The Robots.txt File
There’s no point spending lots of time optimising your website if it’s hidden from search engines. The most common issue with blocked crawling involves the robots.txt file. Most websites have a robots.txt file, and it’s like a rule book to search engines directing what should and shouldn’t be crawled. You can check it by visiting your website’s homepage and adding “/robots.txt” on the end of the domain in the URL bar (e.g. https://www.sqdigital.co.uk/robots.txt). Make sure the following lines are not present in the file:
User-agent: *
Disallow: /*
Or
User-agent: Googlebot
Disallow: /*
If they are present and your website pages are not in Google or any other search engines, consider removing them or asking your website developers to investigate the issue. As technical SEO specialists, we have also seen the below issue on several occasions:
User-agent: *
Disallow: /
This rule is like the one above but instead of asking search engines not to crawl all pages, this is specific to the homepage. If you can see many of your website’s pages in SERPs but not the homepage, then this could be the problem.
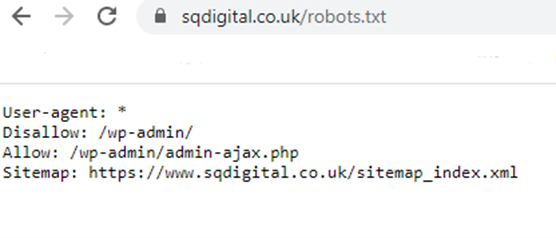
Here is our robots.txt file:
We ask all search engines not to crawl our admin files and point out our sitemap.xml file to make its discovery a little easier.
Meta Robots Directives
Unlike the robots.txt file, meta robot rules don’t dictate what should and shouldn’t be crawled to search engines. Instead, as the page is crawled, the meta robots direct the search engine to either ‘index’ or ‘noindex’ the page. If the meta robot directive ‘noindex’ is present on the page, this will also stop it from appearing in SERPs.
On the page in question, if you right-click and select ‘view-source,’ you will see the page's source code. Selecting CTRL + F on your keyboard will allow you to search for ‘nofollow’. This is the line you want to make sure is not present:
<meta name="robots" content="noindex, nofollow">
Ask your developers to change it to “index, follow” if it is.
To quickly find information about your website’s technical SEO health, submit your website for a Free SEO Audit. This will highlight if any indexing or crawling issues are present.
The Sitemap.xml File
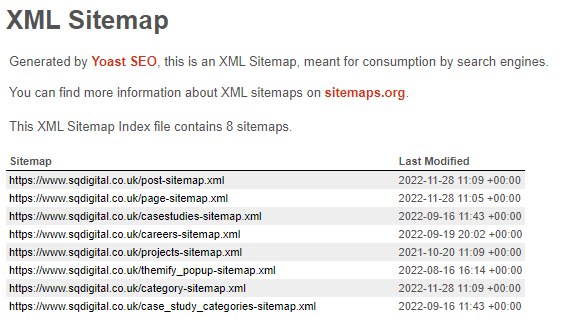
Not having or having this file won’t have the same large impact as the above two points, however, the presence of a sitemap.xml file can significantly improve the number of pages indexed in SERPs and the speed that they fall into the index. To check if you have one, visit [your homepage]/sitemap.xml (e.g. https://www.sqdigital.co.uk/sitemap_index.xml).
If a file loads with lots of URLs or links to other files with lots of URLs, you have a sitemap.xml file, and all is fine. If you encounter a 404 error, then ask your developers to add a sitemap.xml file.
Step 2 – Place Keywords in Meta Tags, URLs & HTML Tags
Every webpage that showcases a product or service as well as the homepage should be optimised for search terms. These are terms that someone may type into Google where their intent matches the content on your website page that you want them to find.
We call these terms ‘keywords’. Every page should have a unique set of related keywords. To explain the full process of keyword research would require its own blog post, so instead, for more information, we recommend this beginner's guide to keyword research from Moz.
Once you have a list of keywords for each page, these need to be included in the following places:
The Title Tag & Meta Description
The title tag is the purple text in Google SERPs. While you want the keywords present in the text, you also want them to be natural and catch the eye of the reader. The title tag also appears as the text in the tab at the very top of the browser. The visible section of the title tag is limited to roughly 60 characters.
The smaller black text is the meta description, which is only visible in SERPs. This is roughly limited to 160 characters and should contain additional information that should grab the reader and encourage them to click.
URL
This is the page's web address and is displayed in your browser's address bar at the top of the page.
It is good practice to include the keyword in the URL. However, optimising the URL when the page is published for the first time is best. URLs can be altered after this point, but a permanent redirect must accompany them. This will also lead to redirected internal links (301 links) and redirect chains which will need to be addressed to ensure the technical health of the domain is maintained.
For help with anything mentioned so far, we are always happy to provide onsite SEO services and advice.
HTML Heading Tags
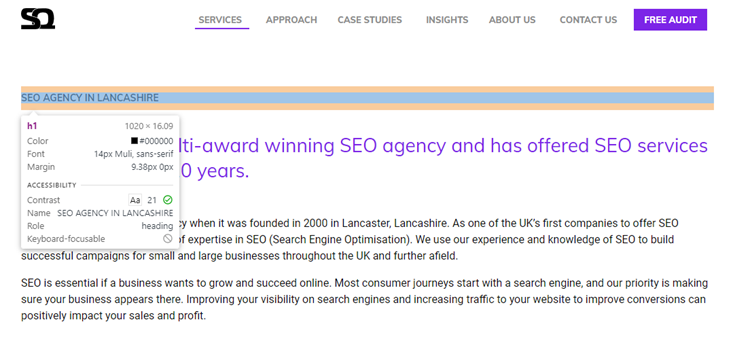
HTML heading tags are headings marked up correctly for search engines to understand heading hierarchy.
A page title would be the main heading on the page. In HTML, this is called heading 1 (h1) and needs to be marked up as such in the source code. The h1 should include the main keyword of the page.
Ask your developers to check the main heading on the page is a h1 and secondary headings are h2, and so on.
Step 3 – Create Meaningful Content
We like to think of web page content as analogous to the in-store shopping assistant. They’re there to guide you to the products or services you need, answering questions along the way.
Website content should be detailed, concise and written entirely for the reader to help guide them to the right place on your website to fulfil their needs. The importance of well-written website content can’t be understated. When writing with the reader in mind, you will automatically write SEO-friendly content.
Many recent algorithm updates have centred on promoting high-quality content, a trend that won’t disappear anytime soon.
Following the initial metadata and HTML tag optimisation, we often see the most significant increases in rank performance from adding user-friendly copy written by our content marketing experts.
Step 4 – Add Valuable Schema Mark-Up
Schema.org markup is a community-collaborated code that enables search engines to pull snippets from your page and display certain information in SERPs. This improves click-through rates (CTR) on web pages. Only certain pages are eligible for certain schema types. For example, only a product page can benefit from price and in-stock-rich snippets. For instance, our client, Offshore Supply, sells Gamazyme Fresh. This product page has product schema including price and availability details:
The additional details can encourage clicks. Another example is the ‘HowTo’ schema. We often include this schema on our step-by-step blogs, just like this one. Here is how it can change our listings' appearance in SERPs:
Not all rich snippets have the same benefits. Here is our list of the most beneficial types we recommend you have if applicable:
- Review (Aggregate Rating & ReviewCount)
- FAQ
- Product (Price and Availability)
- VideoObject
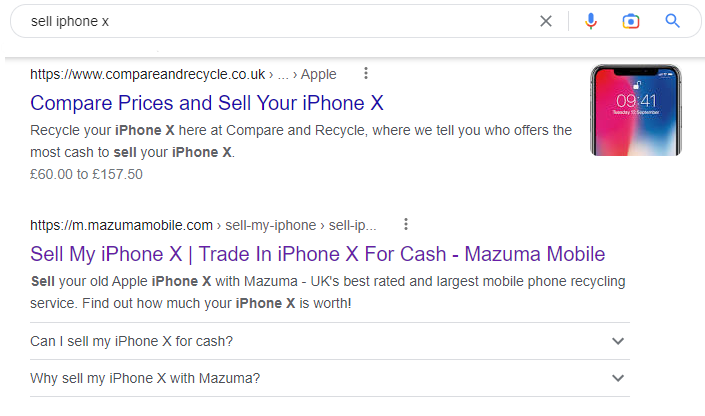
FAQ schema, surprisingly, can have one of the most significant benefits to CTR. We recently compared the price and availability enhancements with FAQ accordions for our client Mazuma Mobile. Where the price was similar between listings, using FAQ markup showed a greater CTR improvement.
Step 5 – Optimise for Page Experience
Page experience is an umbrella expression for many factors that contribute to a webpage visitor's overall experience. It includes things such as:
- Webpage layout, styling, and design
- Page loading speed (Core Web Vitals)
- Mobile Usability
- Total number of clicks required for a user journey
- Any many other factors…
The design and architecture of your website should be user-friendly. We have a team of WordPress website designers who can craft your website so that user experience, responsive design and core web vitals are all taken care of.
These factors are important for conversion rate optimisation and engagement. Once the steps above increase the traffic volume to your website, this step will start to help capture some of that footfall as leads or product conversions.
Step 6 – Identify Keyword Gaps
By this point, following steps 1 to 5, your website should be in a good place regarding onsite SEO.
To maximise your website’s potential in SERPs, you can compare it to competitor listings to identify pages or keywords they rank for that you don’t. This is called an SEO competitor keyword gap analysis. If relevant, you can create new pages or expand existing copy to include alternative ways of phrasing services or products.
You essentially cast the net out wider by making your website relevant for a larger number of keywords that are in demand (regularly searched for). For keyword demand data, we would recommend the following:
- Keyword planner
- SEMrush
- Keywords Everywhere
The top two options have limited but free options, whereas the latter is a chrome extension but is pay-as-you-go, and you can top up credit when needed.
Step 7 – Create a Blog Strategy
Just like step 6, blogs can target question-related keywords usually asked by those at the initial stages of the buying or enquiring journey. This further casts the net out over a broader online audience.
You, or a blog writing agency, can tactfully write blogs that answer peoples’ questions, getting your brand name in front of consumers early on. Blogs can potentially transition the reader from the information acquisition phase to purchase or enquiry ready. Blog content can then funnel traffic to your website's product or service pages.
This blog content strategy is something we employ for all our clients with great results.
...So, there you have it, 7 simple steps that make up an effective onsite SEO strategy.
But Does It Really Work?...
You don’t have to take our word for it. Our clients’ results speak for themselves.
We employed a similar strategy for Mazuma Mobile over a 5 month period, and these were the organic results:
Over the 5-month period, comparing year-on-year, Mazuma Mobile benefitted from:
- 58,301 more organic sessions
- 4,953 more orders placed from organic traffic
- 65% more new users
Want Some Help with Your Onsite SEO Strategy?
If you would like to see similar results, then please get in touch. We are a full-service digital agency offering results-driven SEO services. We look forward to hearing from you.


